You’ve seen the custom tees online and want to make your own without a massive investment in industrial gear. The problem is that many starter kits trade mesh tension and frame durability for a low entry cost, leaving you frustrated with blurry prints and frames that warp after a few washes. Your goal is not just to print once but to build a repeatable process.
I’m Rikta — the co-founder and writer behind FitlyFast. I track material science changes in mesh count, frame alloys, and ink viscosity to separate genuine beginner tools from disposable craft kits.
After reviewing dozens of models based on frame rigidity, mesh quality, and ease of reclaiming screens, I’ve built a guide to the best beginner screen printing kit that actually survives your first dozen projects.
How To Choose The Best Beginner Screen Printing Kit
Every beginner makes the same mistake: they grab the cheapest all-in-one box and expect professional results. Screen printing is a physical process — ink is pushed through mesh by sheer force. Low-quality frames flex under that force, causing ghosting and uneven ink deposits. You need to know exactly which specs to prioritize and which features are just marketing filler.
Frame Material: Wood vs. Aluminum
Wood frames are lightweight and forgiving for your first practice runs, but they absorb moisture and warp over time, especially after repeated cleaning. Aluminum frames cost slightly more but hold tension indefinitely and resist corrosion from water and emulsion remover. If you plan to reclaim screens (clean off old emulsion and reuse them), aluminum is the longer-lasting path.
Mesh Count: 110 vs. Higher Numbers
Most beginner kits ship with a 110-mesh screen. This is ideal for thick plastisol inks and opaque prints on dark fabrics, but it lays down a heavy layer of ink. Higher mesh counts (up to 305 or 355) allow finer detail and thinner ink deposits, better for light-colored or gradient designs. Beginners should start with 110 to master ink control, then add finer screens as their technique improves.
Stencil Method: Paper, Vinyl, or Emulsion
Three ways to create your stencil: paper stencils (cut by hand with a craft knife, fastest method, but single-use), vinyl stencils (cut with a Cricut or Silhouette, great for beginners without chemical exposure, reusable for a few prints), or photo-emulsion (requires a darkroom setup, yields the highest detail and durability). The right choice depends on whether you own a cutting machine and how many prints you want per stencil.
Quick Comparison
On smaller screens, swipe sideways to see the full table.
| Model | Category | Best For | Key Spec | Amazon |
|---|---|---|---|---|
| VEVOR 4-Color 1-Station Press | Press + Frames | Multi‑color registration practice | 21.2×17.7 in print area, 40 lbs steel | Amazon |
| Speedball Paper Stencil Kit | Paper Stencil Kit | First‑time users learning the basics | 10×14 in wood frame, 4oz ink included | Amazon |
| Speedball Craft Vinyl Kit | Vinyl + Screen Kit | Cricut/Silhouette owners | 10×14 in wood frame, no chemicals needed | Amazon |
| Caydo 6-Piece Wood Set | Multi‑Size Wood Set | Budget variety for practice | 3 sizes, 0.8 in thick wood frames | Amazon |
| VEVOR 4-Pack Aluminum 355 Mesh | Aluminum Frame Pack | High‑detail fine‑line printing | 20×24 in, 355 nylon mesh, 15N tension | Amazon |
| Caydo 3-Piece Aluminum 110 Mesh | Aluminum Frame Trio | Budget upgrade to aluminum | 3 sizes, 110 mesh, aluminum frames | Amazon |
| JAJADO Christmas Stencil Kit | Themed Stencil Pack | Holiday craft projects | 23 pcs, nylon adhesive stencils, chalk paste | Amazon |
In‑Depth Reviews
1. VEVOR 4 Color 1 Station Screen Printing Press

This is the press you buy when you are ready to move beyond single‑color prints into real multi‑color registration work. The 4‑color 1‑station design uses a heavy cold‑rolled steel frame that screws onto your workbench for zero wobble during printing. Each of the four arms rotates independently on metal bearings and locks into position stops that keep your screens aligned print after print.
The double‑layer pallet reduces off‑contact issues, though the lack of micro‑registration adjustments means you must align your screens manually by taping registration marks on the pallet. Assembly takes about 30 minutes and requires real wrenches, but once set, the arm repeatability is excellent for the price. Users who tightened the bearing bolts fully reported zero side‑to‑side play.
This press is best for one‑color printing across four screens or for four‑color work if you have patience with manual registration. It includes no screens or ink, so you will need to buy those separately. The 21.2×17.7 inch print area accommodates most adult t‑shirt designs comfortably.
Why it’s great
- Rigid steel frame eliminates vibration during printing
- Independent metal bearings keep arms locked in position
- Double‑layer pallet improves off‑contact consistency
Good to know
- No micro‑registration — requires manual screen alignment
- Must be bolted to a workbench for stability
- No screens or ink included
2. Speedball Paper Stencil Beginner Screen Printing Kit
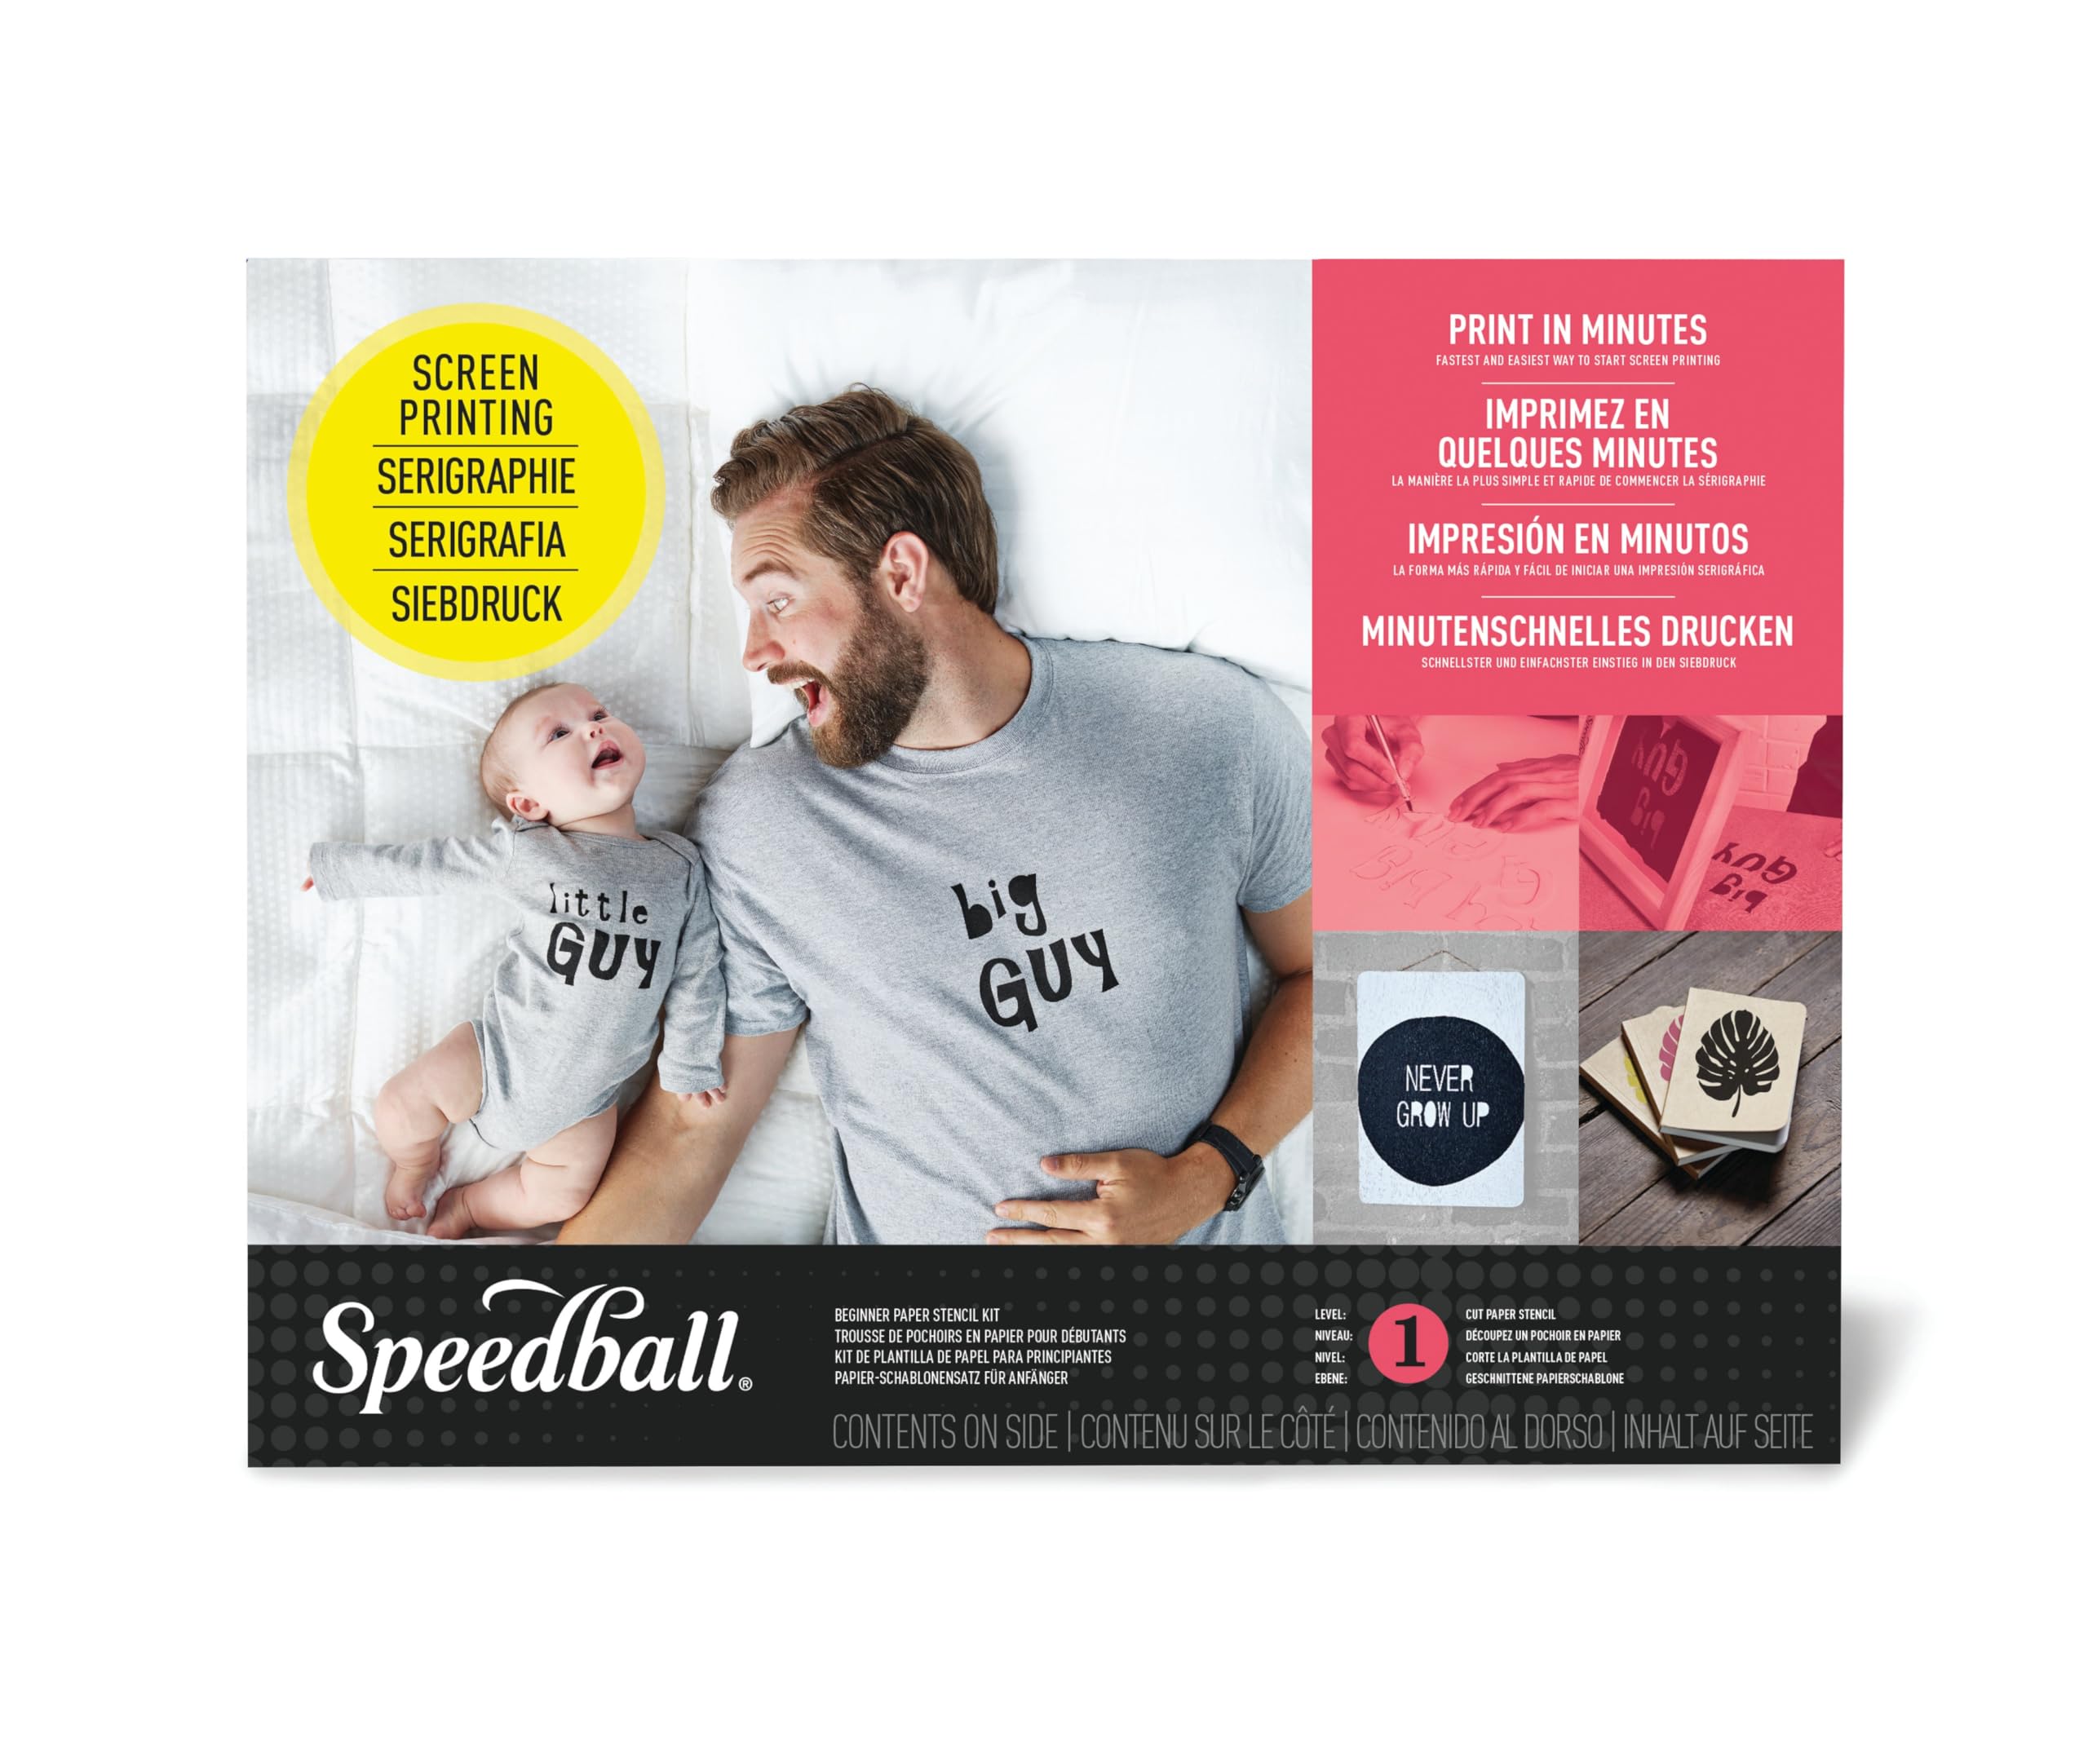
Speedball has been the go‑to brand for screen printing instruction in schools for decades, and this kit proves why. It uses the paper stencil method — you cut your design into the included marker paper pad with the craft knife, tape the stencil to the underside of the 10×14 inch wood frame, and pull ink across. No emulsion, no chemicals, no special lights. You can be printing within 15 minutes of opening the box.
The kit includes a 110‑mesh frame, a Red Baron squeegee, 4oz of black fabric ink, the paper pad, a craft stick, and a craft knife. The instructions are clear enough that absolute beginners can start without watching a single YouTube tutorial. The wood frame is serviceable, though the mesh tension is moderate — expect some ghosting on very detailed cuts.
You can cut up to 50 stencils from the included paper pad. The biggest limitation is that paper stencils wear out after one or two prints, and cleanup requires removing the paper tape each time. Buy extra ink immediately — the 4oz bottle barely covers 10 shirts. This kit is the cleanest, fastest way to learn the physical mechanics of screen printing without investing in a full emulsion setup.
Why it’s great
- No chemicals or emulsion needed for first prints
- Clear instructions make it ideal for teens and classrooms
- Includes craft knife and paper pad for immediate use
Good to know
- Paper stencils are single‑use only
- Ink quantity is small — purchase more before starting
- Wood frame may warp after multiple cleanings
3. Speedball Beginner Screen Printing Craft Vinyl Kit

If you already own a Cricut or Silhouette cutting machine, this kit removes the steepest learning curve — hand‑cutting stencils. Instead of cutting paper or coating emulsion, you cut your design from the included permanent adhesive vinyl with your machine, weed the negative space, and transfer the vinyl directly onto the mesh of the 10×14 inch wood frame. The vinyl acts as a positive stencil: ink passes through the cut areas.
The kit comes with a Red Baron squeegee, 4oz of black fabric ink, three sheets of craft vinyl, three sheets of transfer tape, parchment paper, and a craft stick. The process is incredibly fast — one user reported printing tea towels within 30 minutes of unboxing. No screen filler, no emulsion, no exposure unit required. Cleanup is simply washing the screen with water; the vinyl peels off during cleaning.
The downside is that the transfer tape is not reusable, and the vinyl stencil degrades after one or two prints, especially if you apply heavy pressure. The kit includes only three vinyl sheets, so you should stock up on additional craft vinyl if you plan to print multiple designs. This kit is the best bridge between vinyl crafting and true screen printing for anyone with a cutting machine at home.
Why it’s great
- Integrates seamlessly with Cricut/Silhouette workflows
- No chemicals or emulsion required
- Fastest turnaround from design to finished print
Good to know
- Transfer tape is single‑use only
- Vinyl stencils wear out after 1–2 prints
- Only three vinyl sheets included — need to buy more
4. Caydo 6 Pieces 3 Size Wood Silk Screen Printing Frame Set

Caydo delivers a budget‑friendly solution for beginners who want multiple frame sizes without paying premium prices. This set includes six frames — two each of the 10×14 inch, 8×12 inch, and 6×10 inch sizes — all made from wood with pre‑stretched 110‑mesh polyester fabric. The 0.8 inch thickness gives the frames enough rigidity for basic single‑color prints without flexing excessively under standard squeegee pressure.
Users consistently note that the mesh tension is decent for the price point, though not as tight as professional‑grade screens. The mesh works best for solid block letters and simple shapes; fine lines below 2mm tend to fuzz due to the moderate tension. The wood construction is lightweight and easy to handle, and the frames clean up well with water and a mild degreaser.
The main trade‑off is durability. After multiple washes and reclaiming cycles, the wood edges may fray and the mesh can begin to separate from the frame. For someone printing their first 20 shirts, these frames are a solid choice. They also pair directly with butterfly hinges for registration, making them a practical addition to a starter press setup.
Why it’s great
- Six frames across three sizes provide design flexibility
- Lightweight wood construction is easy to handle
- Budget price leaves room for extra ink and squeegees
Good to know
- Wood frames may warp after repeated wet cleaning
- Mesh tension is not as tight as aluminum screens
- Not suitable for ultra‑fine detail prints
5. VEVOR 4 Pieces Aluminum Silk Screen Printing Frames 355 Mesh

When you are ready to print halftones and fine linework, these 355‑mesh aluminum frames from VEVOR are the upgrade you need. The 20×24 inch size gives you room for larger designs, and the high‑tension nylon mesh is rated at 15±0.5N — nearly double the tension of most beginner wood frames. This tension prevents the mesh from stretching under the squeegee, resulting in sharp, consistent ink deposits every pass.
The aluminum alloy frames are laser‑welded and polished, so they resist corrosion from reclaiming chemicals like emulsion remover and ink degradants. Each frame comes pre‑sealed with silver tape along the edges to prevent ink seepage. Users report that the screens hold tension well past 10 washes and reclaiming cycles, making this a cost‑effective investment for serious beginners who plan to print long‑term.
The trade‑off is that 355 mesh is a finer thread count — it deposits less ink per pass, so you need thicker ink viscosity or multiple passes for opaque prints on dark fabric. Beginners accustomed to 110 mesh will need to adjust their squeegee angle and pressure. These frames do not include a squeegee, ink, or any stencil materials.
Why it’s great
- High‑tension nylon mesh (15N) delivers crisp fine details
- Aluminum frames resist corrosion and won’t warp
- Laser‑welded construction holds up to heavy reclaiming
Good to know
- 355 mesh requires technique adjustment from standard 110
- Large 20×24 in size may not fit small starter presses
- No ink or squeegee included in the pack
6. Caydo 3 Piece Aluminum Silk Screen Printing Frames 110 Mesh

Caydo offers a rare entry‑price aluminum frame set that competes with wood frames on cost while delivering the durability advantages of metal. The three frames — 10×14 inch, 8×12 inch, and 6×10 inch — are made from lightweight aluminum alloy with a smooth surface that resists corrosion. The 110 mesh is uniform and dense enough for standard textile inks, and the frames maintain their tension even after repeated cleaning cycles.
Users who pair these with butterfly hinges on a press report that the frames lock in securely without wobble. The .7 inch frame height is slightly thinner than the wood Caydo set, but the aluminum construction makes up for it in stiffness. The ink‑resistant surface reduces staining, and cleanup requires less scrubbing than wood frames because the aluminum does not absorb ink.
The main limitation is that the fastening system uses small clips that can loosen over time if overtightened. Also, the 110 mesh is standard for thick plastisol but will not capture fine detail. For the price, this is the best way to get aluminum durability without paying premium brand prices, especially if you plan to reclaim and reuse screens for months.
Why it’s great
- Aluminum frames resist water and chemical warping
- Three sizes cover most beginner design needs
- Dense 110 mesh produces solid, opaque prints
Good to know
- Frame clips can loosen with repeated use
- 110 mesh not suitable for fine halftone details
- No squeegee or ink included
7. JAJADO Silk Screen Stencils Christmas Chalk Paste Starter Kit

This JAJADO kit takes a different approach — instead of building your own stencils, you get ten pre‑cut adhesive nylon stencils with Christmas themes (snowman, tree, Santa sled, reindeer, etc.) plus six jars of colored chalk paste and seven squeegees. The stencils have a sticky back that adheres to most surfaces, reducing ink bleed underneath. Simply peel, place the stencil, drag the chalk paste over it, peel off, and let dry.
The nylon mesh is lightweight and reusable — you can wash it with water after each use. The stencil sizes range from 5×7 inches up to 8.5×11 inches, which is small enough for tote bags, pillow covers, and aprons but too small for a full t‑shirt front design. The chalk paste is water‑based and works best on porous surfaces like wood, paper, and uncoated fabric.
This kit is not a traditional screen printing setup — it leans more toward craft stenciling with chalk paste rather than ink. If you want to learn the full screen printing process (emulsion, reclaiming, registration), this kit is a detour. But for a quick holiday craft session with kids or a one‑afternoon project decorating gift tags and wooden signs, it is fun and low‑commitment.
Why it’s great
- No cutting, no emulsion — just peel and print
- Includes chalk paste, squeegees, and multiple designs
- Adhesive back prevents ink bleed on most surfaces
Good to know
- Stencil sizes too small for full t‑shirt fronts
- Chalk paste differs from standard screen printing ink
- Limited to the included Christmas designs
FAQ
Can I screen print without owning a Cricut or cutting machine?
What is the difference between 110 and 355 mesh for a beginner?
How many prints can I get from a single screen before I need to reclaim it?
Final Thoughts: The Verdict
For most users, the best beginner screen printing kit winner is the Speedball Paper Stencil Kit because it teaches you the fundamental mechanics of pulling ink through mesh without requiring any special equipment, chemicals, or cutting machines. If you want to skip hand‑cutting and already own a Cricut, grab the Speedball Craft Vinyl Kit. And for the ambitious beginner planning to eventually run multi‑color jobs, nothing beats the VEVOR 4‑Color Press as a sturdy foundation for your home shop.